

This article is dedicated to GraphQL. I will explain what GraphQL is and what advantages it has over REST. Then we will create a simple web application that exposes GraphQL API on server-side and consumes it on client-side.
Stack on server-side:
- Python;
- Django;
- Graphene Django for creating GraphQL API.
Stack on client-side:
- TypeScript;
- React;
- React Apollo for interacting with GraphQL API.
Also I will show you how GraphQL Code Generator library can simplify development by generating TypeScript types and React Higher Order Components (HOCs) based on our GraphQL queries and mutations. This library will greatly reduce the amount of code that needs to be written.
GraphQL vs REST
If you’re a web developer you’re probably already at least a little bit familiar with REST APIs. The concept behind REST is simple. You have resources and each resource has its own endpoint. And you have actions (GET, PATCH, DELETE, …) that allow you to perform different operations on these resources like getting resource, updating resource, deleting resource and etc. But if you’re developing REST API you’ll probably face some problems.
Imagine that you have an endpoint for fetching user. When you send a request:
http get /users/1
You will get something like this:
{
  "id": 1,
  "name": "Den",
  "followers": [5, 10, 15],
  "avatar": 42
}
It’s ok if you need only the name of the user, but what if you need information about user’s followers? Then you need to send another three http requests because this user has three followers:
http get /users/5
http get /users/10
http get /users/15
Too many requests, especially if the user has a large number of followers.
Another approach could be to create multiple endpoints:
http get /users/1
http get /users_with_followers/1
But it can explode into too many endpoints:
http get /users/1
http get /users_with_followers/1
http get /users_with_followers_and_avatars/1
http get /users_with_avatars/1
...
In that case, you only need to send one http request but it becomes very hard to read and maintain this API.
And the last approach could be to just return everything:
{
  "id": 1,
  "name": "Den",
  "followers": [
		{
			"id": 5,
			"name": "Peter",
			"followers": [25, 26],
			"avatar": {
				"url": "<https://avatars2.githubusercontent.com/u/234f2>",
				"width": 350,
				"height": 300,
			}
		},
		...
	]
  "avatar": {
		"url": "<https://avatars2.githubusercontent.com/u/9641723>",
		"width": 400,
		"height": 300,
	}
}
But what if you need only the name of the user? In that case, you’ll get a bunch of data that you don’t need.
So that’s where GraphQL comes into play. GraphQL is a query language for your API and it can completely replace REST. It has some features that solve common REST problems:
- Client specifies all the data that it needs in a query. It means no more over-fetching and under-fetching data because client gets exactly what it needs. Nothing more and nothing less.
- Client gets all the data in a single request which is not possible in REST APIs because REST requires loading data from multiple URLs.
- We have a single endpoint. No more v2 and v3 for the same API. Old fields can be deprecated and hidden from tools.
- Our API is strongly typed. This makes validation easier and provides us with useful client tools like auto-generated documentation or real-time error highlighting that wouldn’t be possible if the API wasn’t typed.
GraphQL concepts
GraphQL has three main operations:
- Query – fetch data from the server;
- Mutation – modify/create data on the server or run anything with side effects like sending emails and etc;
- Subscription – create long-lived connection with the server which allows client to receive event-based realtime updates.
Graphene Django doesn’t support subscriptions for the moment of writing this article. So we’re going to discuss only queries and mutations here.
GraphQL exposes these 3 operations via a schema. Schema is comprised of types. Types are custom objects that represent how your data looks like. For example, if you’re building a blog, your API should have types like Post, Like, Comment and etc. In our app we will create a type Note:
type Note {
    id: ID!
    title: String!
    body: String!
    createdAt: DateTime!
}
Types have fields and each field has a type. For example, title field has a type String.
Exclamation point at the end of the type means that the field is non-nullable, which means that the field should always return some data.
After we create our schema, we can send different requests to API using GraphiQL interface.
For example, we can make a query:
As you can see, the result has the same shape as a query.
Or we can send a mutation:
Server-side
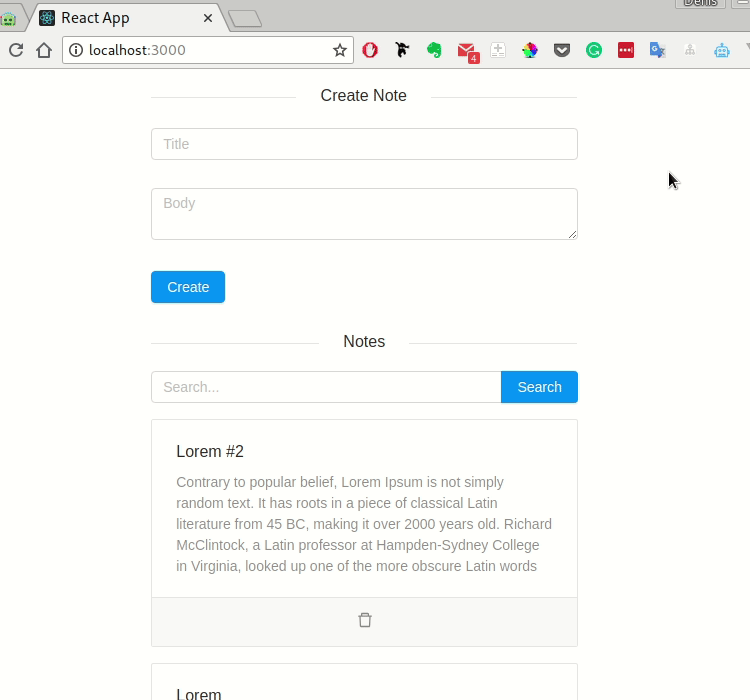
With that said, let’s create a simple web application. The end result will look like this:
The source code of the application can be found here.
Set up boilerplate
Before we start messing with GraphQL we need to do a couple of simple steps:
- Create an empty Django project:
# create folders
$ mkdir django-react-graphql-simplenote
$ cd django-react-graphql-simplenote
$ mkdir back && cd back

# create and activate virtualenv
$ virtualenv -p python3 .venv && source .venv/bin/activate

# install dependencies
$ pip install django graphene-django django-filter djangorestframework

# start project
$ django-admin startproject simplenote .
- Create
notesapp:
$ django-admin startapp notes
Don’t forget to add this app to settings:
# back/simplenote/settings.py

...

INSTALLED_APPS = [
    ...
    'notes',
]
- Create
Notemodel:
# back/notes/models.py

from django.db import models
from django.utils.translation import ugettext_lazy as _


class Note(models.Model):
    title = models.CharField(max_length=255)
    body = models.TextField()
    created_at = models.DateTimeField(auto_now_add=True)

    class Meta:
        verbose_name = _('note')
        verbose_name_plural = _('notes')
        ordering = ('-created_at', )

    def __str__(self):
        return '{} (#{})'.format(self.title, self.pk)
Also don’t forget to make migrations:
$ python manage.py makemigrations
$ python manage.py migrate
Create GraphQL API
Type
First let’s start from creating GraphQL NoteType which will be based on Note model:
# back/gql/notes/types.py

from graphene_django import DjangoObjectType
from notes.models import Note


class NoteType(DjangoObjectType):
    class Meta:
        model = Note
        only_fields = (
            'id',
            'title',
            'body',
            'created_at',
        )
        use_connection = True
Typically, when you create an object type, you need to create a resolver function for each field. It could look like this:
class NoteType(DjangoObjectType):
    is_old = Boolean()

    class Meta:
        ...

    def resolve_is_old(root, *args):
        return root.created_at < (timezone.now() - timezone.timedelta(days=666))
Resolver function is a method that being called when the client requests a field. But we don’t need to do any of this because DjangoObjectType does this automatically for every field that we specified in only_fields.
Another thing that might be confusing is use_connection = True. This line creates connection for NoteType. Connection allows us to slice and paginate data in GraphQL query when we’re trying to get a list of notes. You could read this article if you want to learn more about connections.
Query
Since we have NoteType, now we’re ready to create a schema itself:
# back/gql/schema.py

from graphene import Argument, Field, ID, ObjectType, Schema
from graphene_django import DjangoConnectionField
from notes.models import Note
from .notes.types import NoteType


class Query(ObjectType):
    notes = DjangoConnectionField(NoteType)
    note = Field(NoteType, id=Argument(ID, required=True))

    def resolve_notes(root, info, **kwargs):
        return Note.objects.all()

    def resolve_note(root, info, **kwargs):
        return Note.objects.get(id=kwargs.get('id'))


schema = Schema(query=Query)
Before trying to test if it works, we should make some changes in settings:
# back/simplenote/settings.py

INSTALLED_APPS = [
    ...
    'graphene_django',
]

...

GRAPHENE = {
    'SCHEMA': 'gql.schema.schema'
}
And create an endpoint for our API:
# back/simplenote/urls.py

...
from django.views.decorators.csrf import csrf_exempt
from graphene_django.views import GraphQLView

urlpatterns = [
    ...
    path('graphql/', csrf_exempt(GraphQLView.as_view(graphiql=True))),
]
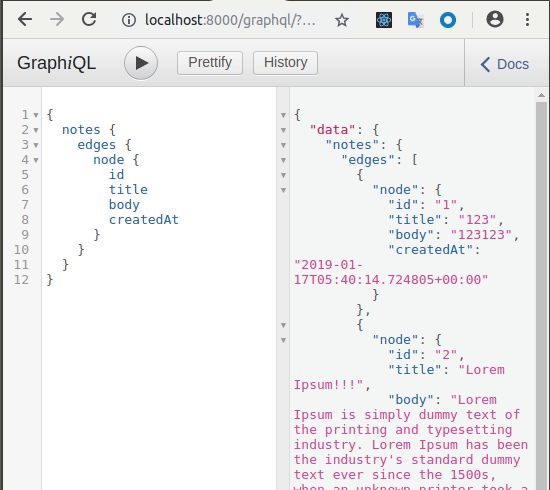
Now we should be able to get a list of notes or any specific note by its id. You can test it by making a query in GraphiQL:
Filter
Graphene Django integrates with django-filter library. It allows us to filter result data in different ways. Let’s create a search filter which will search notes based on values of title and body:
# back/gql/notes/filters.py

from django.db.models import Q
import django_filters
from notes.models import Note


class NoteFilter(django_filters.FilterSet):
    search = django_filters.CharFilter(method='filter_search')

    class Meta:
        model = Note
        fields = ()

    def filter_search(self, queryset, name, value):
        return queryset.filter(
            Q(title__icontains=value) | Q(body__icontains=value)
        )
In order for it to work, we should update Query.notes field:
# back/gql/schema.py

...
from graphene_django.filter import DjangoFilterConnectionField


class Query(ObjectType):
    notes = DjangoFilterConnectionField(NoteType, filterset_class=NoteFilter)
    ...
Let’s test it:
Mutation
Another important concept in GraphQL is mutations. In our app we should be able to create and delete notes. Let’s write these mutations down:
# back/gql/notes/mutations.py

from graphene import Boolean, Field, ID, InputObjectType, Mutation, String
from rest_framework import serializers
from notes.models import Note
from .types import NoteType


class NoteSerializer(serializers.ModelSerializer):
    class Meta:
        model = Note
        fields = (
            'id',
            'title',
            'body',
        )


class NoteInputType(InputObjectType):
    title = String()
    body = String()


class NoteCreate(Mutation):
    class Arguments:
        input = NoteInputType(required=True)

    note = Field(NoteType)

    @classmethod
    def mutate(cls, root, info, **data):
        serializer = NoteSerializer(data=data.get('input'))
        serializer.is_valid(raise_exception=True)

        return NoteCreate(note=serializer.save())


class NoteDelete(Mutation):
    class Arguments:
        id = ID(required=True)

    ok = Boolean()

    @classmethod
    def mutate(cls, root, info, **data):
        note = Note.objects.get(id=data.get('id'))
        note.delete()

        return NoteDelete(ok=True)
As you can see from the code, I’ve used django rest framework for validating input data. Graphene Django has integration with django rest framework and django forms out of the box but I don’t like how it’s implemented, so I prefer to write CRUD operations myself.
Before trying to test it, we need to update our schema:
# back/gql/schema.py

...
from .notes.mutations import NoteCreate, NoteDelete

...

class Mutation(ObjectType):
    note_create = NoteCreate.Field()
    note_delete = NoteDelete.Field()


schema = Schema(query=Query, mutation=Mutation)
Now we’re good to go:
Cross-Origin Resource Sharing
The last thing that we shouldn’t forget to do is to add CORS headers to responses. Because if the client tries to send a request to our API it will get an error like this:
Failed to load <http://localhost:8000/graphql/:>
Response to preflight request doesn't pass access control check:
No 'Access-Control-Allow-Origin' header is present on the requested resource.
Origin '<http://localhost:3000>' is therefore not allowed access. If an opaque response serves your needs, set the request's mode to 'no-cors' to fetch the resource with CORS disabled.
To prevent this, we need to install django-cors-headers:
$ pip install django-cors-headers
And update settings:
# back/simplenote/settings.py

INSTALLED_APPS = [
    ...
    'corsheaders',
]

MIDDLEWARE = [
    ...
    'corsheaders.middleware.CorsMiddleware',
    'django.middleware.common.CommonMiddleware',
    ...
]

CORS_ORIGIN_ALLOW_ALL = True
Client-side
We’re done with API!

Now we can start working on our client application that will consume this API that we have just created. On client-side we will use:
- TypeScript and React;
- React Apollo for interacting with GraphQL API;
- React Router;
- GraphQL Code Generator;
- Ant Design which provides UI design and React components out of the box.
Set up boilerplate
First we need to create a project and install dependencies:
# start project
$ create-react-app simplenote --scripts-version=react-scripts-ts
$ mv simplenote front && cd front

# install dependencies
$ yarn add antd react-router-dom query-string graphql graphql-tag apollo-cache-inmemory apollo-link-http apollo-client react-apollo
$ yarn add -D @types/react-router-dom @types/graphql @types/query-string
$ yarn add -D graphql-code-generator graphql-codegen-typescript-common graphql-codegen-typescript-react-apollo-template graphql-codegen-typescript-template
GraphQL Code Generator
We will start from writing GraphQL queries and generating TypeScript types and HOCs based on these queries.
The queries will look like this:
// front/src/views/Notes/queries.ts

import gql from 'graphql-tag';

export const NOTES_QUERY = gql`
    query NotesQuery($search: String) {
        notes(search: $search) {
            edges {
                node {
                    id
                    title
                    body
                }
            }
        }
    }
`;

export const NOTE_CREATE_MUTATION = gql`
    mutation NoteCreateMutation($input: NoteInputType!) {
        noteCreate(input: $input) {
            note {
                id
            }
        }
    }
`;

export const NOTE_DELETE_MUTATION = gql`
    mutation NoteDeleteMutation($id: ID!) {
        noteDelete(id: $id) {
            ok
        }
    }
`;
Before generating types and HOCs using graphql code generator library, we should create codegen.yml file which is basically the settings file for the library:
# front/codegen.yml

overwrite: true
schema: "<http://localhost:8000/graphql/>"
documents: "src/**/*.ts"
generates:
  ./src/generatedModels.tsx:
    config: {}
    plugins:
      - "typescript-common"
      - "typescript-client"
      - "typescript-react-apollo"
Now let’s run a command that will generate code for us:
$ yarn gql-gen --config codegen.yml
Some of the generated code looks like this:
export namespace NotesQuery {
  export const Document = gql`
    query NotesQuery($search: String) {
      notes(search: $search) {
        edges {
          node {
            id
            title
            body
          }
        }
      }
    }
  `;
  export type Props<TChildProps = any> = Partial<
    ReactApollo.DataProps<Query, Variables>
  > &
    TChildProps;
  export function HOC<TProps, TChildProps = any>(
    operationOptions:
      | ReactApollo.OperationOption<
          TProps,
          Query,
          Variables,
          Props<TChildProps>
        >
      | undefined
  ) {
    return ReactApollo.graphql<TProps, Query, Variables, Props<TChildProps>>(
      Document,
      operationOptions
    );
  }
}
Seems confusing at first, but you don’t need to understand everything. What we have here is:
- Document which is a query itself.
- Generated Props which will help us to type component props.
- Generated HOC which can be used like this:
const withNotes = NotesQuery.HOC(...)
React components
Let’s create Apollo Client and connect it to React using Apollo Provider. Apollo Provider will place client to context, which allows us to access the client from anywhere in our component tree:
import { InMemoryCache } from 'apollo-cache-inmemory';
import { ApolloClient } from 'apollo-client';
import { createHttpLink } from 'apollo-link-http';
import * as React from 'react';
import { ApolloProvider } from 'react-apollo';
import * as ReactDOM from 'react-dom';
import App from './App';
import './index.css';
import registerServiceWorker from './registerServiceWorker';

const httpLink = createHttpLink({
    uri: '<http://localhost:8000/graphql/>',
});

const client = new ApolloClient({
    cache: new InMemoryCache(),
    link: httpLink,
});

ReactDOM.render(
    <ApolloProvider client={client}>
        <App />
    </ApolloProvider>,
    document.getElementById('root') as HTMLElement
);
registerServiceWorker();
Before going further let’s make our UI pretty by adding antd styles:
/* front/src/index.css */
@import '~antd/dist/antd.css';
Now let’s create Notes view. I’ve tried to explain tricky parts in the comments:
// front/src/views/Notes/index.tsx

import { Card, Col, Divider, Icon, Input, Row, Spin } from 'antd';
import * as queryString from 'query-string';
import * as React from 'react';
import { compose, withApollo } from 'react-apollo';
import { RouteComponentProps, withRouter } from 'react-router';
import { NoteDeleteMutation, NotesQuery } from '../../generatedModels';
import CreateNoteForm from './CreateNoteForm';

interface INotesState {
    searchQuery?: string;
}

interface INotesBaseProps {
    deleteNote: NoteDeleteMutation.MutationFn;
}

type INotesProps = NotesQuery.Props<INotesBaseProps> & RouteComponentProps;

class Notes extends React.Component<INotesProps, INotesState> {
    constructor(props: INotesProps) {
        super(props);
        // parsing ?search=something to { search: 'something' }
        const query = queryString.parse(props.location.search);
        this.state = {
            searchQuery: query && query.search
                ? query.search.toString()
                : undefined
        };
    }

    public render() {
        const { searchQuery } = this.state;
        const { data } = this.props;

        return (
            <Row>
                <Col span={12} offset={6}>
                    <Divider>Create Note</Divider>
                    <CreateNoteForm
                        onSuccess={this.handleCreateNoteFormSuccess}
                    />
                    <Divider>Notes</Divider>
                    <Input.Search
                        placeholder="Search..."
                        enterButton="Search"
                        defaultValue={searchQuery}
                        onChange={this.handleSearchQueryChange}
                        onSearch={this.handleSearch}
                    />
                    {data!.loading ? (
                        <Spin style={{ marginTop: 16, display: 'block' }} />
                    ) : (
                        <div>
                            {data!.notes!.edges.map(edge => (
                                <Card
                                    key={edge!.node!.id}
                                    style={{ marginTop: 16 }}
                                    actions={[
                                        <Icon
                                            type="delete"
                                            key={edge!.node!.id}
                                            onClick={() => this.handleDeleteNote(edge!.node!.id)}
                                        />
                                    ]}
                                >
                                    <Card.Meta
                                        title={edge!.node!.title}
                                        description={edge!.node!.body}
                                    />
                                </Card>
                            ))}
                        </div>
                    )}
                </Col>
            </Row>
        );
    }

    private handleSearchQueryChange = (event: any) => {
        this.setState({
            searchQuery: event.target.value || undefined
        });
    };

    private handleSearch = () => {
        const { searchQuery } = this.state;
        const { history, location } = this.props;

        // Here we're updating our url after clicking `Search` button.
        // For example, when we type `food` into seach input, our url
        // will transform from `http://localhost:3000/` to
        // `http://localhost:3000/?search=food`
        history.push({
            pathname: location.pathname,
            // parsing { search: searchQuery } to ?search=searchQuery
            search: queryString.stringify({
                search: searchQuery
            })
        });
    };

    private handleCreateNoteFormSuccess = () => {
        const { data } = this.props;
        return data!.refetch();
    };

    private handleDeleteNote = (id: string) => {
        const { data, deleteNote } = this.props;
        return deleteNote({ variables: { id } })
            .then(() => data!.refetch());
    };
}

export default compose(
    withApollo,
    withRouter,
    NotesQuery.HOC({
        options: (props: INotesProps) => ({
            variables: queryString.parse(props.location.search)
        })
    }),
    NoteDeleteMutation.HOC({
        props: ({ mutate }) => ({
            // renaming mutation from `mutate` to `deleteNote`
            // (more readable)
            // and passing it to props
            deleteNote: mutate
        })
    })
)(Notes);
CreateNoteForm component looks like this:
// front/src/views/Notes/CreteNoteForm.tsx

import { Button, Form, Input } from 'antd';
import * as React from 'react';
import { compose, withApollo } from 'react-apollo';
import { NoteCreateMutation } from '../../generatedModels';

interface ICreateNoteFormState {
    noteBody: string;
    noteTitle: string;
}

interface ICreateNoteFormProps {
    createNote: NoteCreateMutation.MutationFn;
    onSuccess: () => any;
}

class CreateNoteForm extends React.Component<ICreateNoteFormProps, ICreateNoteFormState> {
    public state: ICreateNoteFormState = {
        noteBody: '',
        noteTitle: '',
    }

    public render() {
        const { noteBody, noteTitle } = this.state;

        return (
            <Form onSubmit={this.handleSubmit}>
                <Form.Item>
                    <Input
                        placeholder="Title"
                        value={noteTitle}
                        onChange={this.handleNoteTitleChange}
                    />
                </Form.Item>
                <Form.Item>
                    <Input.TextArea
                        placeholder="Body"
                        value={noteBody}
                        onChange={this.handleNoteBodyChange}
                    />
                </Form.Item>
                <Form.Item>
                    <Button type="primary" htmlType="submit">Create</Button>
                </Form.Item>
            </Form>
        );
    }

    private handleNoteTitleChange = (event: any) => {
        this.setState({ noteTitle: event.target.value });
    };

    private handleNoteBodyChange = (event: any) => {
        this.setState({ noteBody: event.target.value });
    };

    private handleSubmit = (event: any) => {
        event.preventDefault();
        const { noteBody, noteTitle } = this.state;
        const { createNote, onSuccess } = this.props;

        return createNote({ variables: { input: { title: noteTitle, body: noteBody } } })
            .then(() => {
                this.setState({ noteBody: '', noteTitle: '' });
                return onSuccess();
            });
    }
}

export default compose(
    withApollo,
    NoteCreateMutation.HOC({
        props: ({ mutate }) => ({
            // renaming mutation from `mutate` to `createNote`
            // (more readable)
            // and passing it to props
            createNote: mutate
        })
    }),
)(CreateNoteForm);
The last thing that we should do is to update the main component:
// front/src/App.tsx

import * as React from 'react';
import { BrowserRouter as Router, Route } from 'react-router-dom';
import Notes from './views/Notes';

class App extends React.Component {
    public render() {
        return (
            <Router>
                <Route exact={true} path="/" component={Notes} />
            </Router>
        );
    }
}

export default App;
Everything should work now.
Pretty! This was an extremely wonderful post. Many thanks for supplying this info.
Thanks for reading 🙂
Hi Denis,
Great tutorial! but I have run into some trouble with the gql-gen, the code it generated have a handful of errors. I did pull your repo and you have no errors.
Some of the things like QueryProps, MutationsProps, and MutationFn all become error unlike yours, you have any idea? thanks!
Hi. I haven’t used graphql for a while but what kind of error does it show?
Do you have the same tsconfig file? https://github.com/apirobot/django-react-graphql-simplenote/blob/master/front/tsconfig.json
QueryProps, MutationsProps, and MutationFn are not in the react-apollo lib
I have copied and pasted the tsconfig.json but no luck
thank you.. !!! good tutotial.
Great tutorial, thank you!
I’m stuck at this stage though:
yarn gql-gen –config codegen.yml
Error message:
Error: Must provide Source. Received: undefined.
I ran into the same problem because my filters.py file wasn’t being imported/used by my schema.py file. Once I had “Search” as a valid variable it worked