

In this article, we’re going to talk about the benefits of distributed systems and how to move to distributed systems using RabbitMQ. Then we will learn the fundamentals of RabbitMQ and how to interact with it using Python.
Distributed systems
In this section, we’re going to learn the importance of distributed systems. If you’re interested in learning this by watching a video, then here it is:
Imagine that we’re building an ecommerce site. When the user makes an order, besides creating a row in the database, we also need to send a notification email to the user with information about the order and generate a report file that can be used somehow in the future.
This flow could look like this:
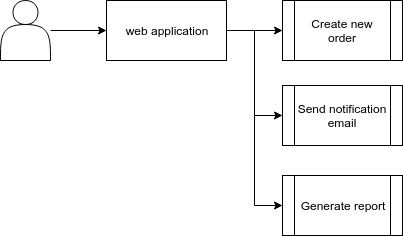
The problem with this approach, though, is that sending an email and generating a report are time consuming tasks. If we do these tasks in the same process during request/response cycle it can take a while till the user gets a response from the server. Especially, it will be hard to scale this application because the more users send requests to the server, the more time it takes to process these requests. And if it already takes a while to process the request, it can increase the burden on the server and the server could even response with a timeout error if it takes too long to process the request.
The solution could be to decouple the web application. Instead of doing all of these tasks, the web application could publish messages to the message broker. The broker would then distribute these messages to the consumers which would then execute these tasks:
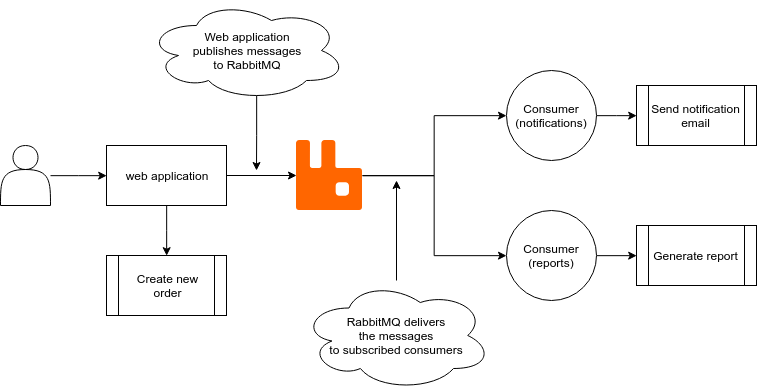
Consumers are basically separate programs that work independently from each other and from the web application itself. The servers that serve these consumers could be even located in different locations.
Another important advantage of distributed systems besides reducing the burden on the server is that applications can keep working even if other applications are down. We can stop our consumer if it’s not able to send notification emails. Our web application will continue to process user’s requests and send messages to the broker despite the fact that our consumer is down. When the consumer is up again, it will receive those messages that web application has sent.
Now let’s talk about RabbitMQ which is an intermediary between producer (web application) and consumers.
RabbitMQ Essentials
If you’re interested in learning RabbitMQ by watching a video, then here it is:
Otherwise, let’s continue.
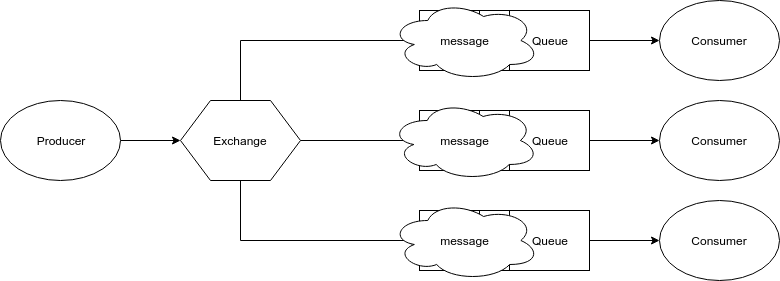
RabbitMQ is a message broker. It implements different protocols, but most importantly, it implements AMQP (Advanced Message Queue Protocol) which is a protocol for systems to exchange messages using Producers, Brokers and Consumers.
How AMQP works
We have a producer and a consumer. Producer produces messages. Consumer consumes them. In between we have a broker which receives messages from the producer and sends them to the consumer.
It becomes a little bit complicated when we look closely at how broker works. The broker has three components:
- Exchange – the component that receives messages from the producer and then routes these messages to the queue;
- Queue – a data structure on disk or in memory that stores messages;
- Binding – connection between an exchange and a queue which tells an exchange what messages should be delivered to what queues.
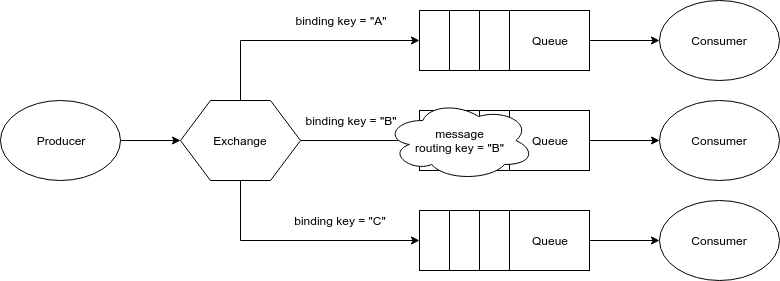
When we create an exchange, we specify an exchange type. When we create a binding between an exchange and a queue, we specify a binding key. When we publish a message, we specify an exchange and a routing key. What messages will be delivered to what queues depends on these 4 criteria.
There are 4 exchange types:
- Fanout. Exchange with this type just sends the message to all of the queues it knows about.
- Direct. Exchange with this type sends the message to the queues where routing key = binding key.
- Topic. Exchange with this type sends the message to the queues where routing key partially matched binding key.
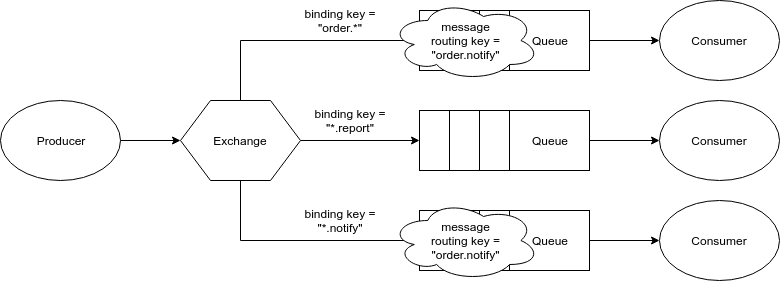
- Header. Exchange with this type allows you to route messages based on header values instead of routing keys.
In the end, a little side note, RabbitMQ has nameless exchange by default. This exchange compares routing key to queue name instead of binding key. If you publish a message to this exchange with routing key = “order”, the exchange will route this message to the queue with queue name = “order”.
Working with RabbitMQ using Python
Now I’m going to show you how to create a simple Python program. It will help us to better understand producer/broker/consumer flow.
We will use Pika library which is a RabbitMQ client library for Python:
$ pip install pika
Let’s declare an exchange with type direct and publish a couple of messages to this exchange:
# publish.py
import pika
import json
import uuid


connection = pika.BlockingConnection(pika.ConnectionParameters('localhost'))
channel = connection.channel()

channel.exchange_declare(
    exchange='order',
    exchange_type='direct'
)

order = {
    'id': str(uuid.uuid4()),
    'user_email': 'john.doe@example.com',
    'product': 'Leather Jacket',
    'quantity': 1
}

channel.basic_publish(
    exchange='order',
    routing_key='order.notify',
    body=json.dumps({'user_email': order['user_email']})
)

print(' [x] Sent notify message')

channel.basic_publish(
    exchange='order',
    routing_key='order.report',
    body=json.dumps(order)
)

print(' [x] Sent report message')

connection.close()
If you run the script, you will see an output:
[x] Sent notify message
[x] Sent report message
You can check whether the exchange was created or not by typing this command in the terminal:
$ sudo rabbitmqctl list_exchanges
Listing exchanges
...
order	direct
In the script we sent two messages. First with routing key = “order.notify”. Second with routing key = “order.report”. But these messages went nowhere because we haven’t bound any queues to this exchange.
Let’s create a consumer that will consume notify messages:
# notify.py
import pika
import json


connection = pika.BlockingConnection(pika.ConnectionParameters('localhost'))
channel = connection.channel()

queue = channel.queue_declare('order_notify')
queue_name = queue.method.queue

channel.queue_bind(
    exchange='order',
    queue=queue_name,
    routing_key='order.notify'  # binding key
)


def callback(ch, method, properties, body):
    payload = json.loads(body)
    print(' [x] Notifying {}'.format(payload['user_email']))
    print(' [x] Done')
    ch.basic_ack(delivery_tag=method.delivery_tag)


channel.basic_consume(callback, queue=queue_name)

print(' [*] Waiting for notify messages. To exit press CTRL+C')

channel.start_consuming()
First we declared a queue with queue name = “order_notify”. Then we bound this queue to the exchange with binding key = “order.notify”. When we publish a message with routing key = “order.notify”, this message will be sent to this queue. Then we consume the message in callback function.
Probably, the last line of callback function is a little bit confusing:
def callback(ch, method, properties, body):
    ...
    ch.basic_ack(delivery_tag=method.delivery_tag)
This line sends an acknowledgement to tell RabbitMQ that the message has been received, processed and RabbitMQ is free to delete it. So if the consumer receives the message and it dies, the message won’t disappear.
When you start the consumer:
$ python notify.py
And publish the messages using the script that we’ve created earlier:
$ python publish.py
You should see an output in the terminal:
[x] Notifying john.doe@example.com
[x] Done
The message has been successfully consumed.
Using the same pattern, we can create a consumer for report messages:
# report.py
import pika
import json


connection = pika.BlockingConnection(pika.ConnectionParameters('localhost'))
channel = connection.channel()

queue = channel.queue_declare('order_report')
queue_name = queue.method.queue

channel.queue_bind(
    exchange='order',
    queue=queue_name,
    routing_key='order.report'  # binding key
)


def callback(ch, method, properties, body):
    payload = json.loads(body)
    print(' [x] Generating report')
    print(f"""
    ID: {payload.get('id')}
    User Email: {payload.get('user_email')}
    Product: {payload.get('product')}
    Quantity: {payload.get('quantity')}
    """)
    print(' [x] Done')
    ch.basic_ack(delivery_tag=method.delivery_tag)


channel.basic_consume(callback, queue=queue_name)

print(' [*] Waiting for report messages. To exit press CTRL+C')

channel.start_consuming()
Conclusion
Using RabbitMQ as a message broker is a great choice. We’ve learnt the fundamentals of RabbitMQ and how to interact with it using Pika library but in real world you will probably use a library like Celery instead of Pika. So check it out if you want to dive into it more.
Hello,
I had to pass the queue name as the first argument before callback in
“`
channel.basic_consume(queue_name, callback)
“`
to get the consumers to work.
Regards
Hi, I’m making a message in python using pika. I have a consumer. When the consumer is listening, does the consumer inform me when the broadcaster is disconnected?